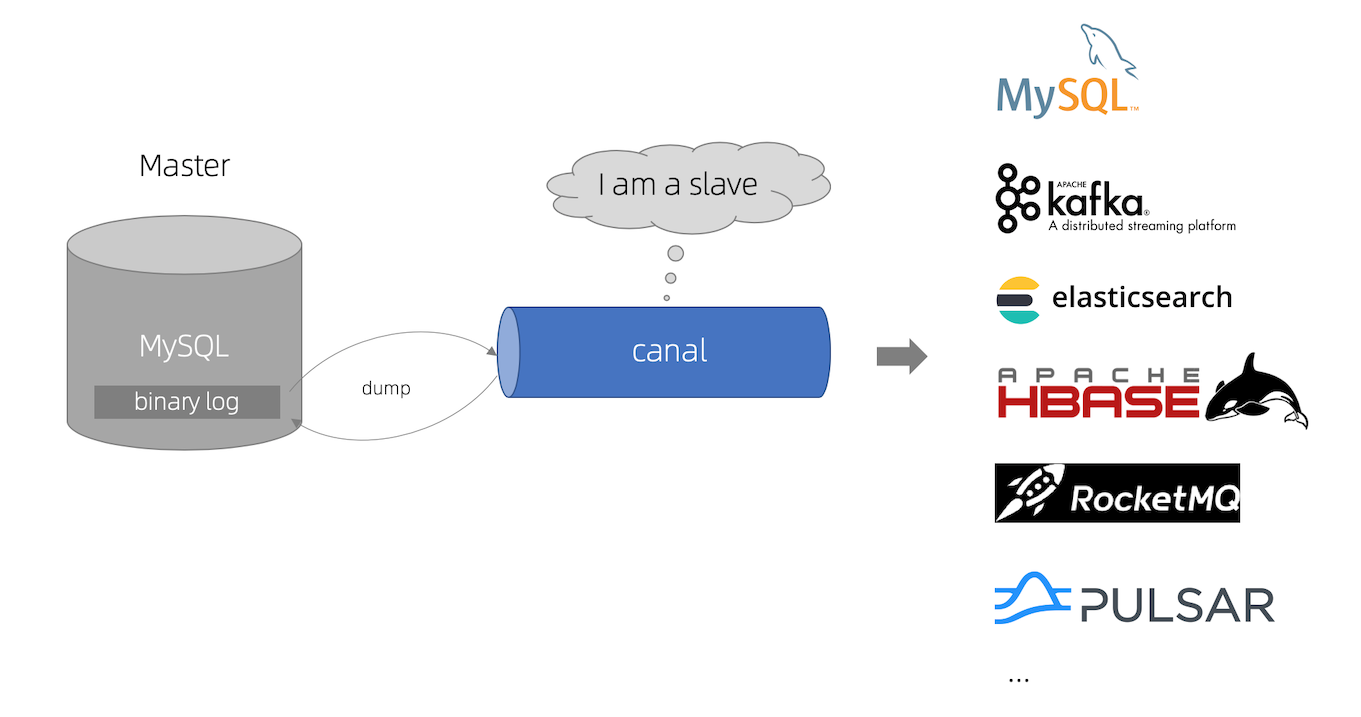
简介 可以使用之前写的Canal阿里巴巴增量订阅更新做简单的主从备份,由于Canal只读取 binary log 日志做增量更新
canal工作流程图.png
通过canal可以做简单的按更新备份也可以通过canal做数据更新,根据更新的内容去更新数据库中其他的字段值ElasticSearch 等服务,适合多样化复杂的MySQL主从操作slave的方式请求binary log消息
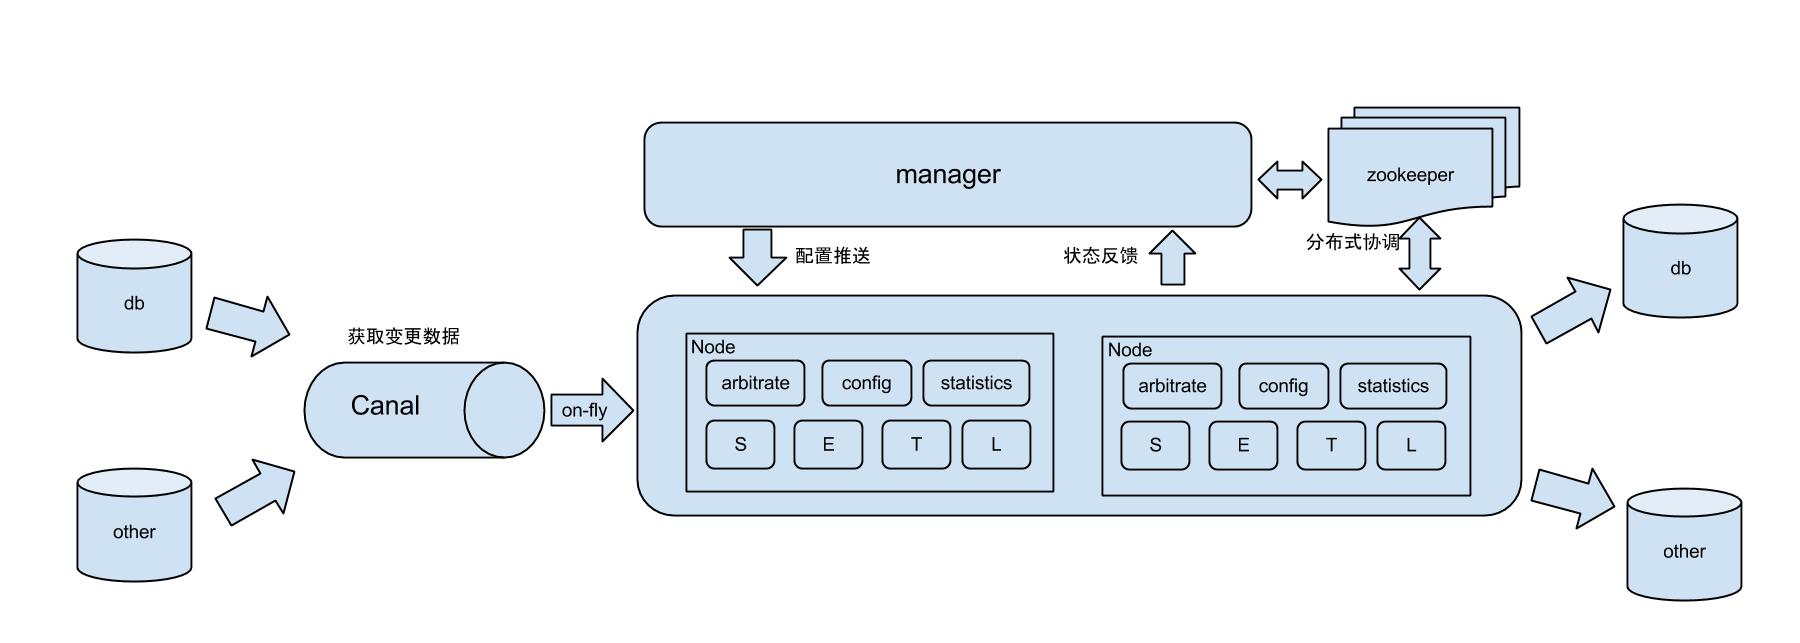
阿里巴巴也为我们提供了更好的基于Canal的分布式数据库同步系统 otter
otter工作原理.jpg
本文所用Docker目的是一台机器搞定集群功能,实际生产环境中不建议使用Docker
参考项目: alibaba/otter - 阿里巴巴分布式数据库同步系统(解决中美异地机房) alibaba/canal - 阿里巴巴 MySQL binlog 增量订阅&消费组件
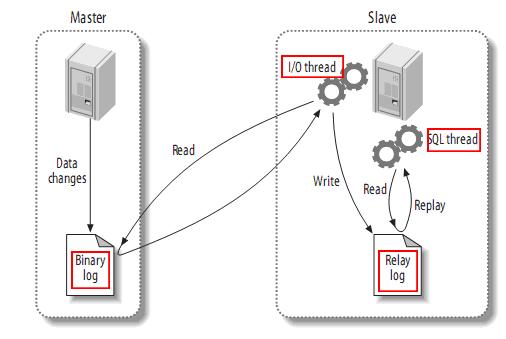
通过MySQL配置主从备份 主从备份,通过配置MySQL做主从备份
主从备份流程图.jpg
注意事项
主从数据库版本保持一致
需要单独的两台服务器(单台机器可使用Docker,没有测试过)
需要网络相连,保证主从服务器通信
表结构不使用外键,使用外键容易造成同步失败
主键使用无意义自增字段
同步数据库所用的账号拥有一定的权限,也可以使用root
安装MySQL 参照之前的文章 MySQL Docker启动
1
2
3
docker run --restart=always --name mysql5.7-1 -p 3307:3306 -v /Users/XXX/Downloads/Docker/mysql5.7-1:/var/lib/mysql -e MYSQL_ROOT_PASSWORD=123456 -d mysql:5.7 --character-set-server=utf8mb4 --collation-server=utf8mb4_unicode_ci docker run --restart=always --name mysql5.7 -p 3306:3306 -v /Users/XXX/Downloads/Docker/mysql5.7:/var/lib/mysql -e MYSQL_ROOT_PASSWORD=123456 -d mysql:5.7 --character-set-server=utf8mb4 --collation-server=utf8mb4_unicode_ci
进入容器内部 安装vim 或者映射 使用参数 -v 映射位置 /etc/mysql/my.cnf 配置文件亦可
安装 vim 方式 编辑 my.cnf
1
2
apt-get install apt-get install vim
挂载 本地文件 内容
1
2
3
4
5
6
7
8
9
10
11
12
13
14
15
16
17
18
19
20
21
22
23
24
# Copyright (c) 2016, Oracle and/or its affiliates. All rights reserved. # # This program is free software; you can redistribute it and/or modify # it under the terms of the GNU General Public License, version 2.0, # as published by the Free Software Foundation. # # This program is also distributed with certain software (including # but not limited to OpenSSL) that is licensed under separate terms, # as designated in a particular file or component or in included license # documentation. The authors of MySQL hereby grant you an additional # permission to link the program and your derivative works with the # separately licensed software that they have included with MySQL. # # This program is distributed in the hope that it will be useful, # but WITHOUT ANY WARRANTY; without even the implied warranty of # MERCHANTABILITY or FITNESS FOR A PARTICULAR PURPOSE. See the # GNU General Public License, version 2.0, for more details. # # You should have received a copy of the GNU General Public License # along with this program; if not, write to the Free Software # Foundation, Inc., 51 Franklin St, Fifth Floor, Boston, MA 02110-1301 USA !includedir /etc/mysql/conf.d/ !includedir /etc/mysql/mysql.conf.d/
配置主从备份 主节点 使用root 用户 配置
修改配置文件 /etc/mysql/my.cnf
1
2
3
[mysqld] log-bin=mysql-bin server-id=1
执行命令
input
1
2
3
GRANT REPLICATION SLAVE ON *.* to 'root'@'%' identified by '123456'; FLUSH PRIVILEGES; SHOW MASTER STATUS;
output
1
2
3
4
5
+------------------+----------+--------------+------------------+-------------------+ | File | Position | Binlog_Do_DB | Binlog_Ignore_DB | Executed_Gtid_Set | +------------------+----------+--------------+------------------+-------------------+ | mysql-bin.000001 | 589 | | | | +------------------+----------+--------------+------------------+-------------------+
从节点 使用root 用户 配置
1
2
3
[mysqld] log-bin=mysql-bin server-id=2
执行命令
input
1
2
3
change master to master_host='172.17.0.2',master_user='root',master_password='123456',master_log_file='mysql-bin.000001',master_log_pos=589; start slave; show slave status\G;
output
1
2
3
4
5
6
7
8
9
10
11
12
13
14
15
16
17
18
19
20
21
22
23
24
25
26
27
28
29
30
31
32
33
34
35
36
37
38
39
40
41
42
43
44
45
46
47
48
49
50
51
52
53
54
55
56
57
58
59
*************************** 1. row *************************** Slave_IO_State: Waiting for master to send event Master_Host: 172.17.0.2 Master_User: root Master_Port: 3306 Connect_Retry: 60 Master_Log_File: mysql-bin.000001 Read_Master_Log_Pos: 589 Relay_Log_File: f919535d2d58-relay-bin.000002 Relay_Log_Pos: 320 Relay_Master_Log_File: mysql-bin.000001 Slave_IO_Running: Yes Slave_SQL_Running: Yes Replicate_Do_DB: Replicate_Ignore_DB: Replicate_Do_Table: Replicate_Ignore_Table: Replicate_Wild_Do_Table: Replicate_Wild_Ignore_Table: Last_Errno: 0 Last_Error: Skip_Counter: 0 Exec_Master_Log_Pos: 589 Relay_Log_Space: 534 Until_Condition: None Until_Log_File: Until_Log_Pos: 0 Master_SSL_Allowed: No Master_SSL_CA_File: Master_SSL_CA_Path: Master_SSL_Cert: Master_SSL_Cipher: Master_SSL_Key: Seconds_Behind_Master: 0 Master_SSL_Verify_Server_Cert: No Last_IO_Errno: 0 Last_IO_Error: Last_SQL_Errno: 0 Last_SQL_Error: Replicate_Ignore_Server_Ids: Master_Server_Id: 1 Master_UUID: 380e925e-a645-11ea-a304-0242ac110004 Master_Info_File: /var/lib/mysql/master.info SQL_Delay: 0 SQL_Remaining_Delay: NULL Slave_SQL_Running_State: Slave has read all relay log; waiting for more updates Master_Retry_Count: 86400 Master_Bind: Last_IO_Error_Timestamp: Last_SQL_Error_Timestamp: Master_SSL_Crl: Master_SSL_Crlpath: Retrieved_Gtid_Set: Executed_Gtid_Set: Auto_Position: 0 Replicate_Rewrite_DB: Channel_Name: Master_TLS_Version: 1 row in set (0.00 sec)
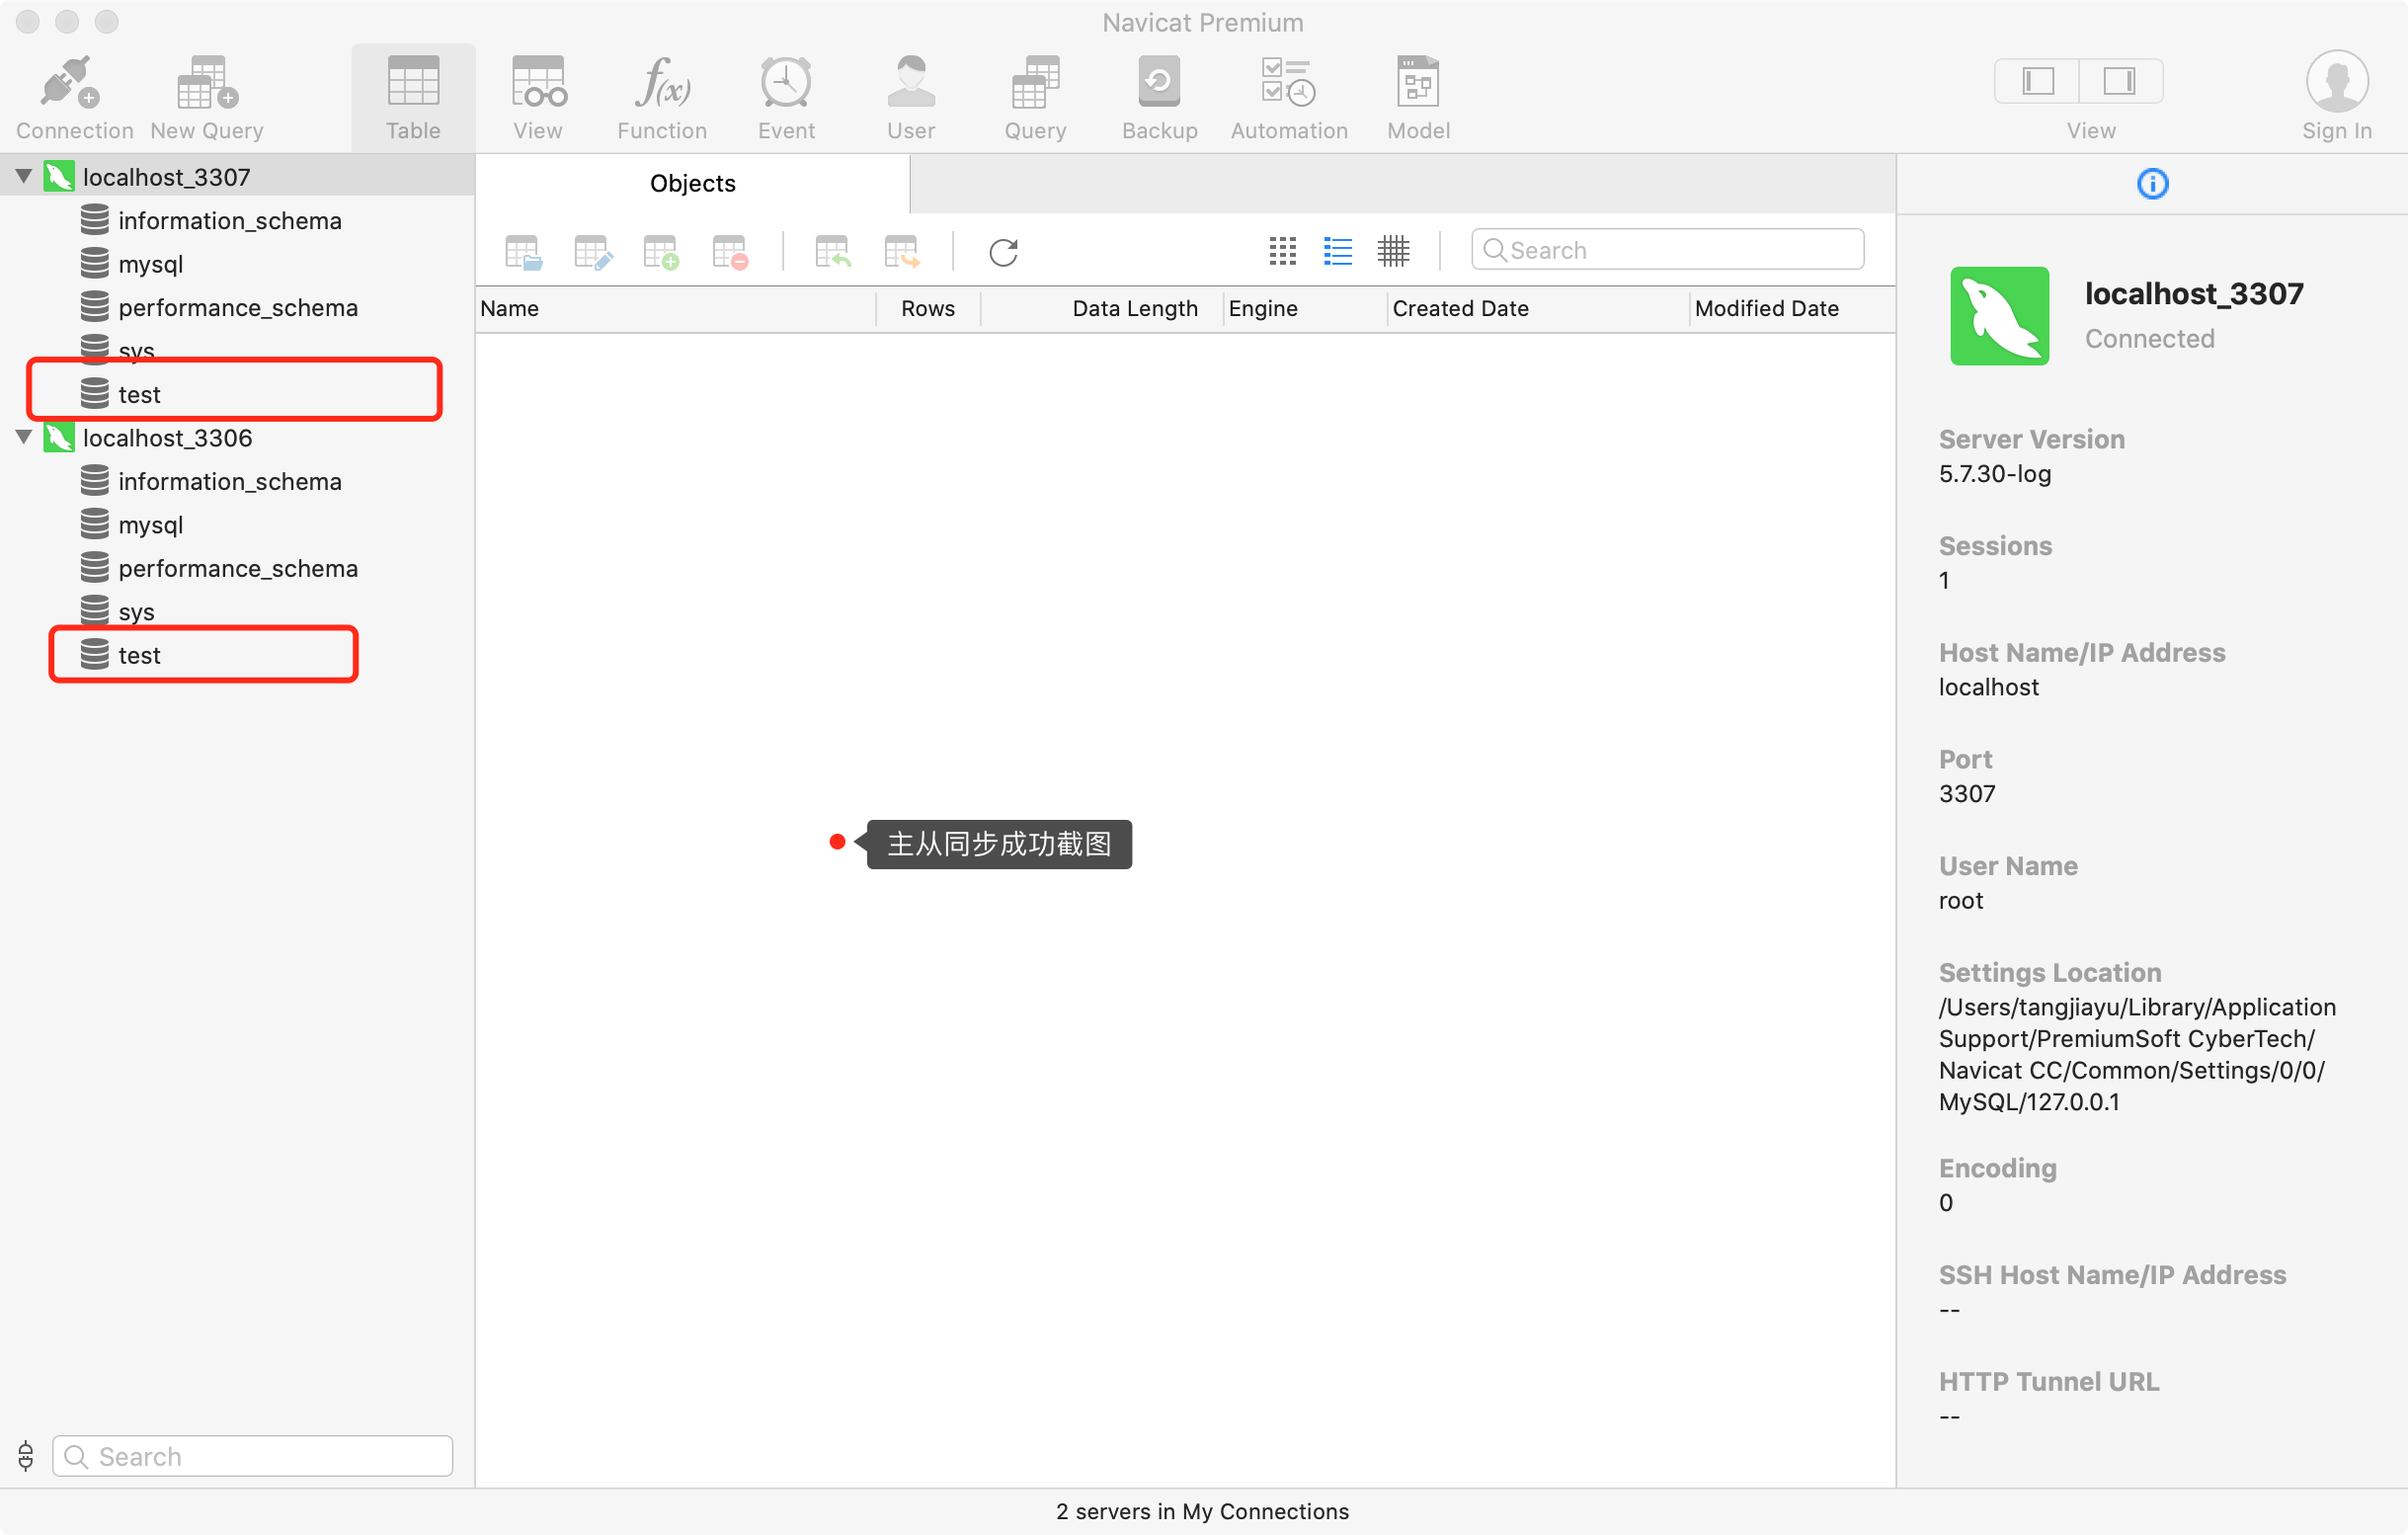
测试 创建一个 test数据库
主从数据库同步.png
监控状态 可以使用crontab 配合钉钉通知 使用 curl命令通知 主从同步是否成功
1
2
3
4
5
6
7
8
# !/bin/bash array=($(mysql -uroot -p -e "show slave status\G" | grep "Running" | awk '{print $2}')) if [ "${array[0]}" == "Yes" ] || [ "${array[1]}" == "Yes" ] then echo "Slave is OK" else echo "Slave is error" fi
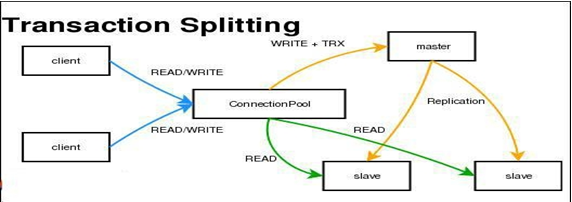
读写分离 master数据库处理写操作,slave数据库处理读操作。利用上面配置的主从数据库,使master数据库的变更实时更新到slave节点上,支持事务,但可能会因为某些原因有阻塞现象发生,不可避免的可能会出现数据同步慢的情况
读写分离.png
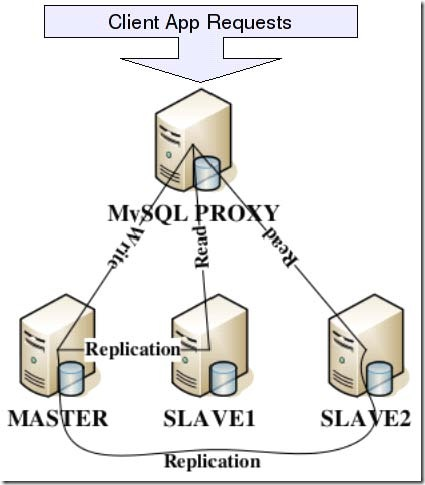
使用 MySQLProxy 做读写分离
MySQLProxy实际上是在客户端请求与MySQLServer之间建立了一个连接池。所有客户端请求都是发向MySQLProxy,然后经由MySQLProxy进行相应的分析,判断出是读操作还是写操作,分发至对应的MySQLServer上。对于多节点Slave集群,也可以起做到负载均衡的效果。
MySQLProxy.png
为何要使用MySQLProxy?其实可以不使用,但为了减少代码量,减少开发成本,可以通过运维的手段去做分发处理。
缺点
目前MySQLProxy仍然是 alpha(内测) 版
通过lua脚本做的读写分离,MySQL官方并不建议使用
配置MySQLProxy读写分离 假定 上述两台服务器 分别为 master slave 那么我们现在需要第三台服务器 proxy
下载 MySQLProxyMySQL Product Archives
由于我的环境为MAC新版,对 MySQLProxy 的支持度并不好,因此并不在本机使用可以参照下面引用的文章参考配置
参考文章
最后更新时间:2020-06-10 14:28:18